In the previous post I talked about how to wire up Sitecore Pages to use your local Content SDK editing host. This post will describe how to switch it in your deployed XM Cloud environment.
If you created your XM Cloud project using the auto-generated repository, you got a clone of the XM Cloud starter kit. That project, currently, includes 2 head apps: Next.js and Angular. By default, when you deploy your project, the Next.js app is set up as the editing host. You’ve now brought in a Content SDK app and want to switch the editing host to that one. So, how do you do it?
Turns out, it’s actually pretty simple. In your project root, look for xmcloud.build.json. Open that file, and add this to the renderingHosts section:
The path should be the path to the folder containing the Content SDK app. You’ll also want to set enabled to true, and set it to false for the other rendering hosts (or just remove those other hosts from this file altogether).
Shout out to Dan Solovay for the assist on this one!
The Sitecore XM Cloud Content SDK was recently released, and it offers a trimmed down, focused kit to build websites with XM Cloud. However, this new SDK hasn’t been put into the default starter kit codebase that gets created when you start a new project. This post will show you how to get your local development environment up and running with the Content SDK, and how to connect it to the Pages editor.
Create your project in XM Cloud Deploy
This step is straightforward. Use XM Cloud deploy to create your project, environment, and codebase. This will create you a repository from the xmcloud-foundation-head repository that Sitecore provides. You can also use the code-first approach if you so choose, but for the sake of simplicity this post assumes you let Sitecore create your project.
When the initial deployment is created, go ahead and create your site in the Sitecore Cloud portal. Choose the blank site starter template.
Once that process completes, go to the Desktop (you can find the Desktop from the Settings screen in the portal) and package up your site. You’ll want this to install to your local environments soon. You should also consider adding a Page Content component to the page to see something other than a blank screen when you load the site.
These are the paths you’ll need to package:
/sitecore/templates/Project/<Your Site Collection>
/sitecore/templates/Branches/Project/<Your Site Collection>
/sitecore/system/Settings/Project/<Your Site Collection>
/sitecore/media library/Project/<Your Site Collection>
/sitecore/layout/Placeholder Settings/Project/<Your Site Collection>
/sitecore/layout/Renderings/Project/<Your Site Collection>
/sitecore/layout/Placeholder Settings/Project/<Your Site Collection>
Once your environment is up and running, install the package you just created to your local CM, located at: https://xmcloudcm.localhost/sitecore/
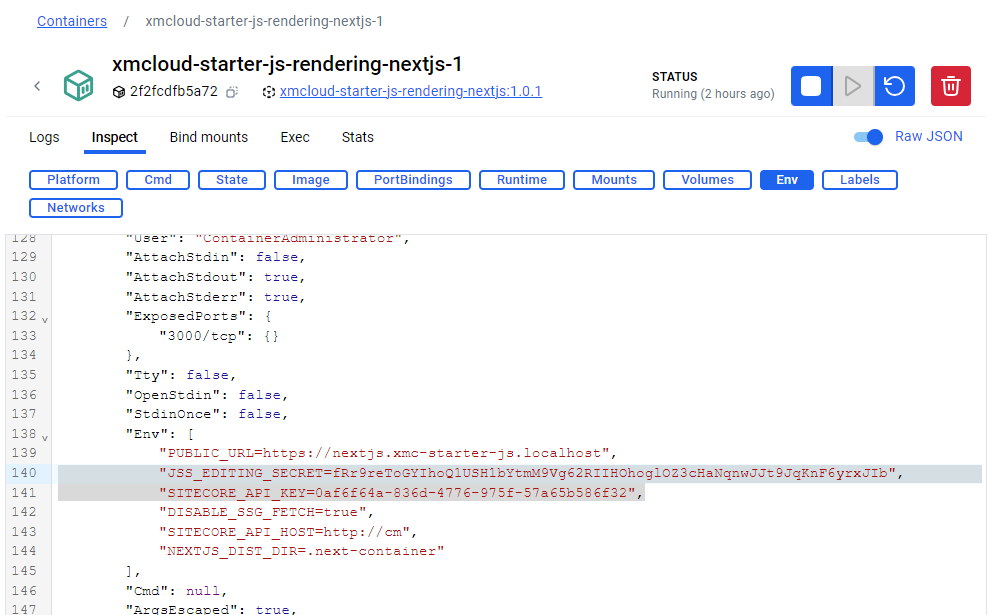
You’ll need to get some environment variables from your local rendering host. Some of these are created when you run init.ps1 to scaffold your containers environment. You can get these from the Docker container, or from the .env file in the /local-containers folder in your project root.
Copy the JSS_EDITING_SECRET and SITECORE_API_KEY values.
To connect to a local CM running in Docker, the steps are similar. Create a .env.local file in the root of your Content SDK project. Add the follwing environment variables:
NEXT_PUBLIC_SITECORE_SITE_NAME=<your Site name from the package>
NEXT_PUBLIC_SITECORE_API_HOST=https://xmcloudcm.localhost
NEXT_PUBLIC_SITECORE_API_KEY=<your API key copied from the Docker container>
JSS_EDITING_SECRET=<your JSS Editing Secret copied from the Docker container>
DISABLE_SSG_FETCH=true
Then, in the terminal, run: npm install npm run start:connected
Test your app in your browser at http://localhost:3000. If you did it correctly you should see a white page with the Page Content component you created and packaged previously.
Connect the Pages Editor to your local environment
Finally, we want to be able to edit our content and test our components in our local environment before we push and deploy anything. To do that, we need to set up Pages to use our local editing host.
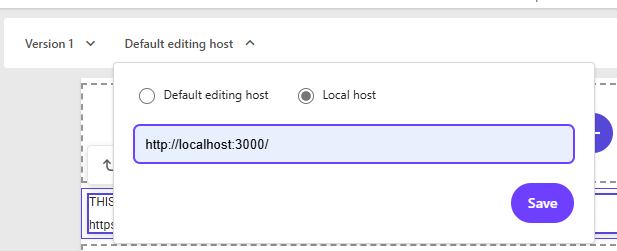
Go to https://pages.sitecorecloud.io/ and log in, then select your site. By default, you’re editing in your XM Cloud environment. Click the Default Editing Host dropdown and change it to localhost:
Afterward, you will see an error like this:
There’s one more step. We need to tell Pages to use our local CM as well. Open your browser tools (F12) and in the Application tab, add this key to local storage: Sitecore.Pages.LocalXmCloudUrl : https://xmcloudcm.localhost
After you do this, you should see your content rendering with the Content SDK and be able to edit the page.
Content SDK in Docker
This post does not cover is getting the Content SDK host running in a docker container. That isn’t strictly necessary to work locally with the Content SDK. However, if you’d prefer to replace the JSS rendering host with the Content SDK one, that will be covered in a later post.
If you’ve been using Sitecore 9 or 9.1, you know that all the services the platform depends upon must communicate using trusted, secure connections. This includes Solr. Sitecore’s instructions and the scripts provided by SIF helpfully walk you through setting up a secure Solr installation as part of standing up your 9.1 environment. Jeremy Davis has also created a wonderful powershell script to install Solr with a self signed certificate that I’ve used quite a bit.
If you follow the steps outlined in these posts, you’ll have Solr Cloud up and running on separate machines. But, when it comes time to create a collection you’re going to run into a problem. You may see something like this in the response:
{"responseHeader":
{"status":0,"QTime":33294},
"failure":{"solr3:8983_solr":"org.apache.solr.client.solrj.SolrServerException:IOException occured when talking to server at: https://solr3:8983/solr","solr2:8983_solr":"org.apache.solr.client.solrj.SolrServerException:IOException occured when talking to server at: https://solr2:8983/solr"},
"success":
{"solr:8983_solr":
{"responseHeader":{"status":0,"QTime":2323},"core":"sample_collection_shard1_replica2"}}}
We created our certificates, the nodes are up and running, Zookeeper is aware of them all, but the Solr nodes can’t seem to communicate with each other. So what gives? If we dig into the logs on any of the Solr servers, we get a little more insight into the problem.
2019-03-05 19:04:49.869 ERROR (OverseerThreadFactory-8-thread-1-processing-n:solr2:8983_solr) [   ] o.a.s.c.OverseerCollectionMessageHandler Error from shard: https://solr3:8983/solr
 org.apache.solr.client.solrj.SolrServerException: IOException occured when talking to server at: https://solr3:8983/solr
     at org.apache.solr.client.solrj.impl.HttpSolrClient.executeMethod(HttpSolrClient.java:626)
     at
...
Caused by: javax.net.ssl.SSLHandshakeException: sun.security.validator.ValidatorException: PKIX path building failed: sun.security.provider.certpath.SunCertPathBuilderException: unable to find valid certification path to requested target
     at sun.security.ssl.Alerts.getSSLException(Alerts.java:192)
...
What we’re seeing here is the Solr servers don’t trust each other. We need to fix that.
There’s a couple of things we need to do here. First, we have to get the self-signed certificates we created for each Solr node and install them on the other servers. On each Solr server, do the following,
Open certlm.msc
Expand Trusted Root Certification Authority -> Certificates and find your Solr certificate you created.
Open the certificate and make a note of the thumbprint. We’ll need this later.
Export the certificate. Make sure you check Include Extended Properties and Mark this Certificate as Exportable in the dialogue.
When prompted for a password, use the same one you configured when installing Solr (the default is “secret”)
Once you have the certificates, you’ll need to install them on the other nodes. On each Solr server,
Import the certificates from the other 2 Solr nodes.
Try to hit the other Solr nodes from the browser on each server. For example, try accessing https://solr2:8983/solr/ from the Solr1 server. (You may need host file entries). If your certificates are installed properly, the browser will not warn you about an untrusted site.
There is one more thing we need to do. The Windows servers might trust our Solr nodes now, but the Solr applications themselves do not. If you take a look at the Solr installation steps, you’ll notice we’re creating a keystore file that holds the certificate for that Solr node (typically named . These keystore files needs to be updated to include the certificates from ALL of the Solr nodes, not just the one for the instance on that server.
We can easily do this with Powershell. We can do it with Java’s keytool.exe too, but we’re Sitecore people and probably more comfortable in Powershell! Remember those thumbprints we noted earlier? We’ll need them now.
Here’s the script, assuming your password is “secret”. Run this on any of the Solr nodes.
Take this generated solr-ssl.keystore.pfx file and copy it over the keystore file in each of the Solr nodes, then stop each node and restart them.
If we did everything correctly, when we try to create our collections again, it should go smoothly and you’ll be up and running with Solr Cloud and Sitecore 9.1.
For more information on the architecture of a Solr Cloud cluster and how to set one up for Sitecore, you can refer to my old blog series on the topic. It was written for 7.2, but the architecture principles haven’t changed. (including the need for a load balancer!)
Sitecore 9.1 comes bundled with a lot of new stuff, including a much improved Sitecore Install Framework. The process of setting up a local environment has been greatly streamlined, now you only need to run a script for installing prerequisites and then the XP0 installer itself. This gives you an instance of XConnect, Sitecore Identity server, both setup on HTTPS with trusted certificates. It will also install the Sitecore XP application for you and set it up on HTTP.
If you need to secure the Sitecore XP application as well, you could create a certificate in IIS and assign it to the HTTPS binding. However, this certificate won’t be trusted, and you’ll have the additional problem that Sitecore Identity Server won’t trust the site either, meaning you can’t log in over HTTPS. We’ll have to do a couple things to get past this.
You may see this error when trying to log into Sitecore 9.1 over HTTPS.
Create a new Trusted Certificate for IIS
First, we have to make a trusted certificate and assign it to our CM site. The certificate generated by IIS won’t cut it, because it uses the SHA1 encryption algorithm which is not accepted by modern browsers. Instead, let’s do what SIF does and make a certificate using Powershell. Alter the DnsName parameter to match the hostname of the Sitecore XP instance you’re working on.
Next we’ll need to export that certificate out of the Personal store and into the Trusted Root Certification Authority. Again, this is exactly what SIF does for XConnect and Identity Server. We can script this too, but it’s easy to do using the UI.
In Windows, run certlm.msc. This is the Local Computer Certificate manager.
Expand Personal -> Certificates and find the sc910.sc certificate.
Right click, and chose Tasks -> Export. Accept the defaults and save the certificate somewhere.
Expand Trusted Root Certification Authority, right click Certificates and choose All Tasks -> Import
Choose your certificate file you just created, and again accept the defaults.
If you did everything correctly, you should see this certificate available in IIS when you try to set up the HTTPS binding.
Setting up the HTTPS binding in IIS with our new certificate.
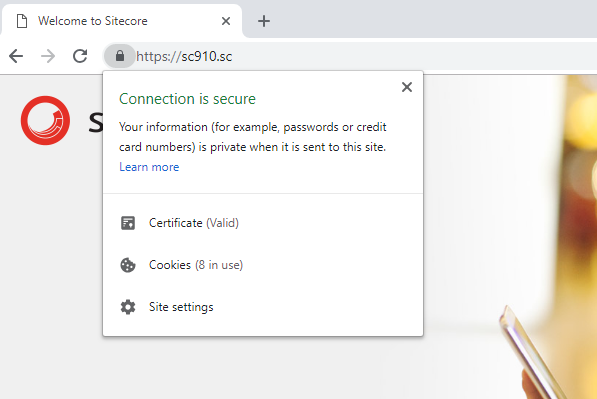
Try hitting your site in your browser, and you should not be prompted that the certificate is not trusted.
Chrome trusts our local Sitecore XP instance now.
However, we still can’t log into Sitecore. The login page says our client is unauthorized. What gives?
Configure Identity Server to Allow a New Client
We have to do one more thing, and that’s tell the Sitecore Identity Server about this new binding. To do this we need to edit a config in the identity server application. Open up \Config\production\Sitecore.IdentityServer.Host.xml in your identity server application folder. Look for the <Clients> block and add a line for our new secure XP binding.
One of the great additions to Sitecore 8 is the ability to publish related items when executing a publish. Using this feature, you’ll be sure to publish out any necessary items that may be needed to render the page correctly, such as data sources, referenced taxonomy items, or images.
However, you may still have some gaps when using this feature. Consider common scenario where you have a new page, and you add a component to the page that uses an separate item as a data source. On that data source is a field for an image. When publishing the page, the newly created data source item goes out, but the media item linked to on that data source does not.
This is because of the way Sitecore processes referenced items. In essence, it only goes one level deep in the reference tree. So, items referenced by the item being published will be added to the queue, but items referenced by those referenced items will not.
Normally this is ok. If the publisher crawled references recursively, you’d probably wind up in an infinite publishing loop, or you’d at least wind up doing a large publish unintentionally. But it is common for data source items to reference new content, like media, so we need to include those in the publish too.
There’s a pipeline in Sitecore 8 we can use specifically for this purpose, the <getItemReferences> pipeline. Out of the box, it includes a step to AddItemLinkReferences. This step is the one responsible for adding our referenced data source item, so we can override this step to add logic to include media referenced by that data source.
Like all great Sitecore developers, we customize Sitecore by reflecting on their code and replacing it with our own logic. I opened up Sitecore.Publishing.Pipelines.GetItemReferences.AddItemLinkReferences, and added the following.
...
  foreach (Item obj in itemLinkArray.Select(link => link.GetTargetItem()).Where(relatedItem => relatedItem != null))
  {
    list.AddRange(PublishQueue.GetParents(obj));
    list.Add(obj);
    // This will look at the item's links looking for media items.
    list.AddRange(GetLinkedMediaItems(obj));
  }
  return list.Distinct(new ItemIdComparer());
}
Then we’ll add the GetLinkedMediaItems method,
protected virtual List<Item> GetLinkedMediaItems(Item item)
{
  List<Item> mediaList = new List<Item>();
  ItemLink[] itemLinkArray = item.Links.GetValidLinks()
    .Where(link => item.Database.Name.Equals(link.TargetDatabaseName, StringComparison.OrdinalIgnoreCase))
    .ToArray();
  foreach (ItemLink link in itemLinkArray)
  {
    try
    {
      Item target = link.GetTargetItem();
      if (target == null || !target.Paths.IsMediaItem)
        continue;
      // add parent media items or folders
      Item parent = target.Parent;
      while(parent != null && parent.ID != ItemIDs.MediaLibraryRoot)
      {
        mediaList.Insert(0, parent);
        parent = parent.Parent;
      }
      mediaList.Add(target);
    }
    catch (Exception ex)
    {
      Log.Error("Error publishing reference link related media items", ex, typeof(AddItemAndMediaLinkReferences));
    }
  }
  return mediaList;
}
We can include this new pipeline by replacing the old one we reflected on.
With this in place, media items referenced on any linked item will be published. You can further refine the logic to just consider data sources, perhaps by checking the path or template to ensure it’s a data source, to cut down on unintentional publishes.
I’ve created a small module to assist with importing users into Sitecore from a csv file. The purpose of the module is to bulk-import users into Sitecore from an external FTP source, but it can also be used to push users into the system in a 1 off manner, for example if you had to move users from another system into Sitecore as part of a site migration. It also comes with an automated agent that can be configured to run regular downloads and imports of user files from an external FTP source.
Overview
The module operates off of items created in Sitecore to represent the import csv sheets. These items contain fields that let you configure how the user will be created based on the data in the sheet, as well as define a role and domain to assign the user to. The module is capable of downloading these csv sheets from an external FTP site and updating the users if the sheet is newer than the last time it was processed. The agent (disabled by default) will iterate over the items in the module’s folder to download the sheet and update the users if the sheet is newer each time it runs. Imports can also be initiated manually using a custom ribbon button on the sheet import items from within Sitecore.
Setting Up
After downloading and installing the package to Sitecore, open /App_Config/Include/Sitecore.SharedSource.UserCsvImport.config to edit the module’s settings. You’ll need to create the folder that will store your csv files that the module will read, this should be in the site’s /data folder. If your csv’s are hosted on an external FTP site, you can define the hostname, username and password here as well.
Using the Module
Open the Sitecore content editor, and in the master database navigate to/sitecore/system/Modules/User Csv Importer/User Csv Sheets. In this folder, you can create the User Csv Sheet items.
On the User Csv Sheet item you’ll find the following fields,
File Name: The make of the sheet of user data to import. If using the FTP download feature, the folder path should match the folders on the FTP server. Ex. /folder/subfolder/usersheet.csv.
Last Updated: The last time the sheet was processed. Clear this field to force the sheet to import again.
Role: The membership role to apply to this user. If it does not exist it will be created.
Identity Field Name: The column in the csv to use for the user’s username.
Email Field Name: The column in the csv to use for the user’s email.
Custom Profile: The profile to use for the users being created. The columns in the csv should map to the fields on this profile item, meaning the field names should match the names of the csv columns. Fields that do not exist will be skipped. See this post for how to set up custom user profiles in Sitecore.
The UserCsvImport module has been tested on Sitecore 7.2 update 3, as well as Sitecore 8.1 initial release. The module depends on a few external libraries. The Custom Item Generator, CSVHelper for reading and parsing the CSV files, and SSH.NET for the support of secure ftp file transfers.